Start here
Your first day in Suparko
Suparko brings projects, team tickets, chat and files into a workspace. Start by setting up your own account, then explore the work your team has shared with you.
Before you begin
- An account or invitation supplied by your workspace administrator.
- Access to the email address used for your account.
- A device with the correct time and timezone settings.
What you’ll learn
- Finish first-time account setup.
- Understand the workspace navigation.
- Find your first assignment and conversation.
In this guide
1. Sign in and finish account setup
Open the Suparko sign-in page with the account details your administrator provided. A new account may require a password change before you can enter the workspace. An invitation or password-reset link is a one-time account setup link; keep it private.
Use your account email
Enter your email and password. Use the eye icon if you need to check what you typed. If your account has an authenticator challenge, enter its current six-digit code.
Choose your own password
If Suparko asks you to replace a temporary password, enter the current password and choose a new password of at least 8 characters. Use a password that you do not share with another service.
Confirm your name
On the welcome screen, confirm or edit your display name, even if your administrator entered it already. You can also add an optional job title.
Check your detected timezone
Suparko detects your timezone from your device. Check the displayed timezone, then select Finish setup. Your role and access come from your administrator; profile setup does not change them.
2. Choose the right workspace
If you belong to more than one workspace, use the workspace selector to choose where you want to work. Projects, teams, conversations and files belong to that workspace. Switching workspace changes the context of the pages you open.
A project or ticket that a coworker can see may be unavailable to you. Access depends on your current workspace membership and the project or team permissions you have been given.
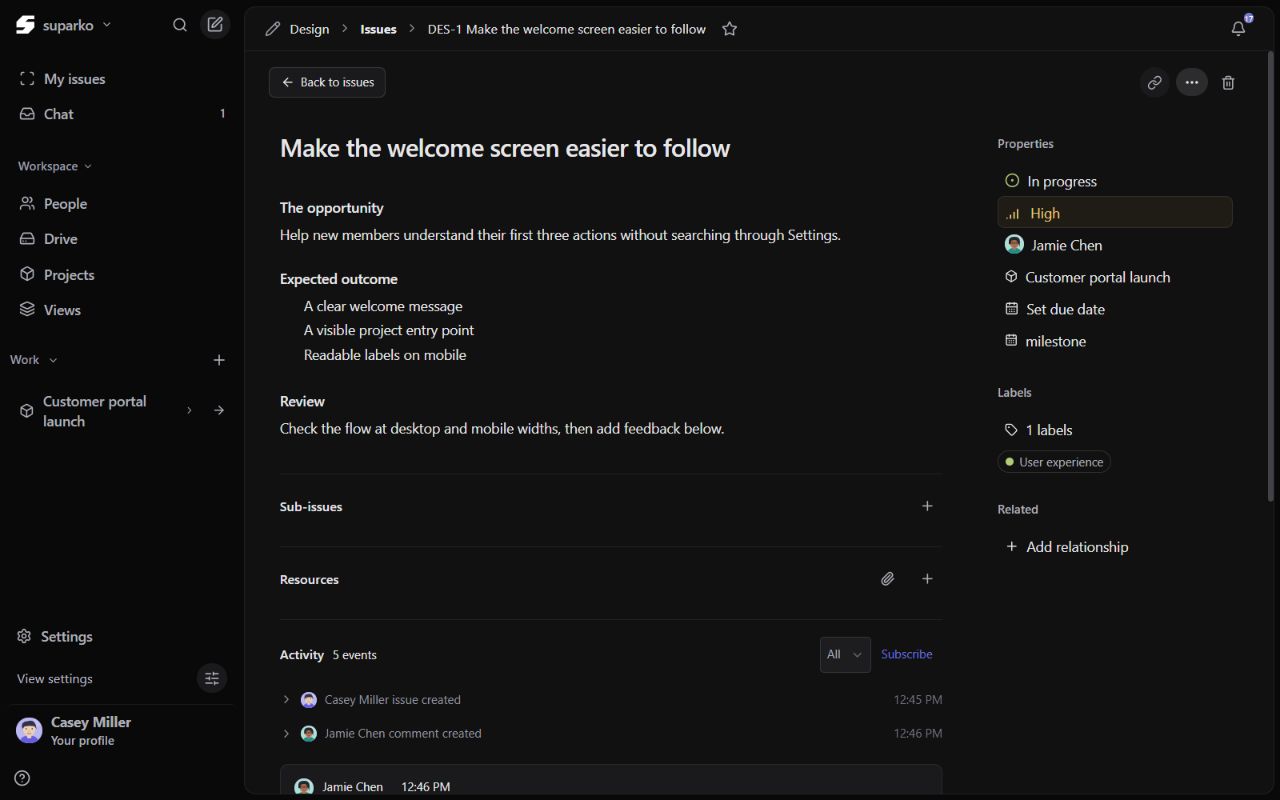
- My issues brings your assigned and relevant tickets into focus.
- Work contains the projects and teams available to you.
- Chat opens your conversations. Drive opens your files.
- The notification bell collects updates that need your attention.
- People opens member profiles. Settings is at the bottom of the sidebar.
3. Find and respond to your first task
Open My issues or expand a project under Work and open a team’s Issues. Select a ticket to read its description, current status, priority and owner before changing anything.
Read the context
Check what the ticket asks for, which project and team it belongs to, and whether a comment or attachment already answers your question.
Add a useful update
If you can edit the ticket, add a comment describing your progress or question. Change status when the actual work reaches that stage.
Start a conversation
Open Chat, select a conversation you belong to, and send a short message. Use the ticket picker to reference accessible work rather than retyping a long ticket description.
4. Make your profile useful to the team
Open Your profile from the bottom of the sidebar, then edit your picture, job title, About you and status. Choose an uploaded picture or a built-in avatar. A short biography helps coworkers understand what you work on.
Suparko uses the timezone detected from your device for your profile. If it is wrong, correct your device settings and sign in again. The workspace’s general timezone is a separate setting.