Manage work
Organize projects, teams and access
Start with the project. Bring the teams doing the work into that project, then create and track their issues. A project can contain multiple teams, and a team can be linked to other projects when its access is configured to allow that work.
Before you begin
- A workspace in which you have permission to create or manage projects.
- A project name and a clear description of the outcome.
- The coworkers and teams that need access to the project.
What you’ll learn
- Build a project with more than one team.
- Understand who can read or change its work.
- Navigate from a project to a team’s issues.
In this guide
Understand the structure before creating work
A workspace is the company or group context. A project describes a shared outcome. Teams organize the people and workflows doing that work. Issues are the individual tickets assigned to a team and, when appropriate, its linked project.
Project access and team access are separate. Being a member of the workspace does not automatically make every private project or team available. A linked team must be compatible with the project for an issue to be placed there.
| Level | What it holds |
|---|---|
| Workspace | Your organization’s members, projects, chat and files |
| Project | A specific outcome and its linked teams |
| Team | A workflow, members and issues |
| Issue | A request, owner, status, priority and discussion |
A shared outcome, with intentional access
Review the welcome screen
Build and verify the flow
Prepare the launch checklist
Project and team permissions determine which work a member can open or change.
1. Create the project first
Open Projects and choose the create action available to your role. Give the project a clear name and description. Choose the access setting deliberately; a private project needs explicit access for its participants.
Describe the result
Use a name such as Website launch, then describe what completion means. Avoid using one vague project for all unrelated company work.
Set the intended audience
Choose the project visibility and give the relevant people appropriate project access. Grant management access only to the people who need to change access and structure.
Open the project
After saving, open the project and use its Teams tab to build the delivery structure.
2. Add the teams doing the work
In the project’s Teams tab, create a team for this project or link an existing team you are allowed to manage. Repeat for each team involved, such as Design, Engineering and Operations. Team membership, project membership and issue edit access still apply after linking.
Create or link
Select the appropriate create or link action, enter the team information and save it. You can bring multiple teams into the same project.
Review access
Check both the project participants and the team’s access. A person who needs to edit team tickets needs the required access to that work, not just a link to the project.
Open team issues
Expand the project and team under Work, then open Issues. This keeps the team’s tickets in the project context.
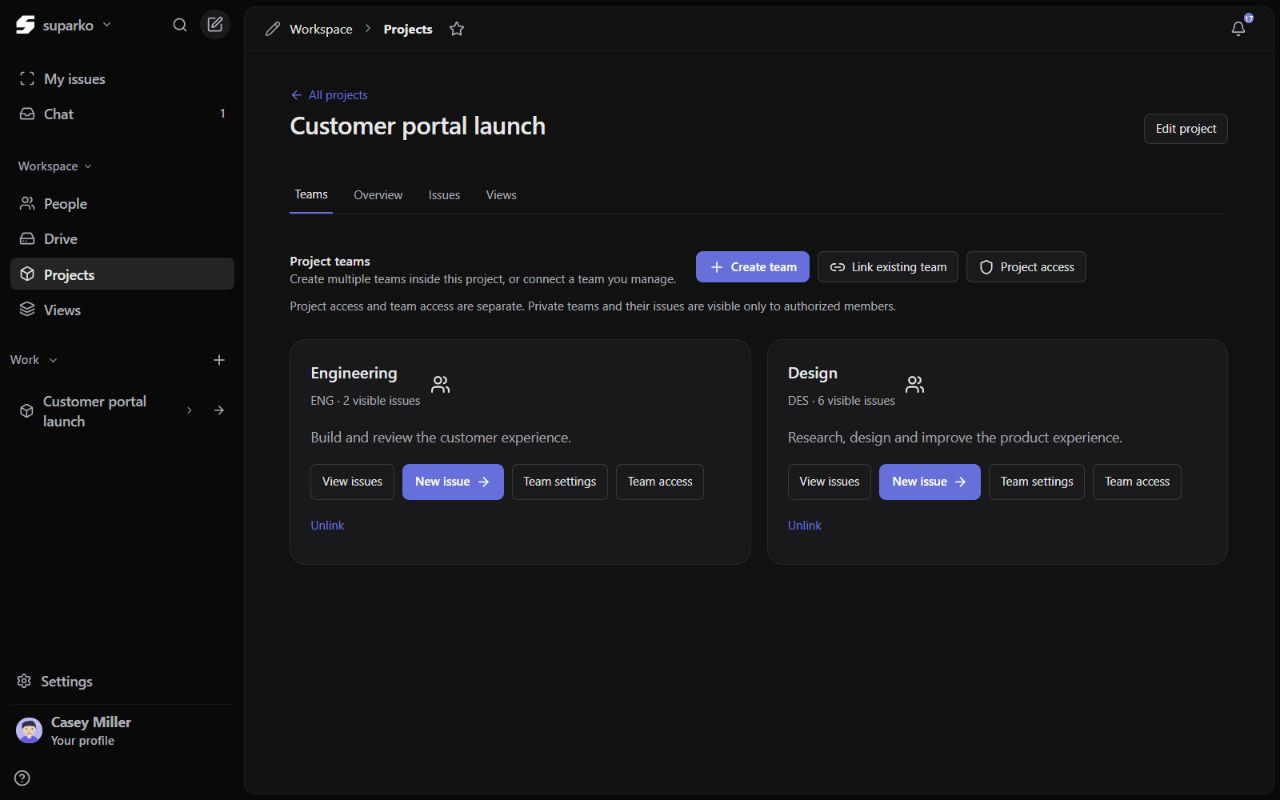
3. Give each person the access they need
Readers can inspect the work they are permitted to see. Editors can change permitted work. Managers can manage access and structure where their role allows it. The labels available in your interface reflect the specific project or team permission being configured.
Access is checked again when you open, search, edit or reference work. If a private project is not available to you, its tickets should not be discoverable through your issue picker. A chat reference can show Ticket not available or Project not available after access changes.
- Choose a private project for work that should be limited to named participants.
- Check team access as well as project access before assigning work.
- Keep at least one authorized manager so the project remains manageable.
- Ask the manager for access instead of sharing another person’s account or integration key.